초기값 0부터 시작해서 간단하게 +/- 버튼이 있고 버튼을 누를 때마다 값이 증가하고 감소하는 앱을 만들어볼게요.
일반적으로 TCA의 State, Action, Reducer는 ReducerProtocol을 준수하는 구조체 안에 정의를 합니다.
ReducerProtocol을 채택한 Counter 구조체를 만들어줄게요.
This file contains bidirectional Unicode text that may be interpreted or compiled differently than what appears below. To review, open the file in an editor that reveals hidden Unicode characters.
Learn more about bidirectional Unicode characters
그다음은 ReducerProtocol을 채택한 구조체(=Counter) 안에 State, Action, Reducer를 정의할 차례입니다.
일단 State 먼저!!
State는 UI를 그리거나 내부 비즈니스 로직을 수행할 때 필요한 데이터들을 정의한 곳이라고 할 수 있습니다.
이번 예시에선 어떤 값을 화면에 보여줄지에 대한 데이터를 가지고 있으면 되기 때문에 count라는 Int 형 변수를 State 구조체 안에 정의를 해줄게요.
한 가지 명심해야 할 점은 State는 Equatable 프로토콜을 준수해야 합니다.
This file contains bidirectional Unicode text that may be interpreted or compiled differently than what appears below. To review, open the file in an editor that reveals hidden Unicode characters.
Learn more about bidirectional Unicode characters
Action은 사용자 interaction 또는 내부 비즈니스 로직에서 생기는 모든 이벤트들을 의미하고 정의합니다.
이번 예시에선 + 버튼 눌림, - 버튼 눌림이 Action에 해당하기 때문에 Action이란 enum에 정의해 줄게요.
이것도 마찬가지로 Aciton은 Equatable 프로토콜을 준수해야 합니다.
This file contains bidirectional Unicode text that may be interpreted or compiled differently than what appears below. To review, open the file in an editor that reveals hidden Unicode characters.
Learn more about bidirectional Unicode characters
This file contains bidirectional Unicode text that may be interpreted or compiled differently than what appears below. To review, open the file in an editor that reveals hidden Unicode characters.
Learn more about bidirectional Unicode characters
reduce 함수는 Action 이벤트가 발생할 때마다 실행되는 함수라고 볼 수 있습니다. 그래서 switch 구문을 사용해서 Action 마다 다른 동작을 하도록 구현해 주면 됩니다.
(Action에 따라 State 값을 바꿀 수 있게 inout으로 선언된 것 보이시죠?ㅎㅎ)
그러면 return .none이 뭘까 하는 의문이 들 텐데요.
none을 반환한 것은 특정 Action이 왔을 때 추가 동작(Action) 없이 Reducer를 종료시키겠다는 의미입니다.
(지금 예시에선 +/- 버튼이 눌리고 State 변경 후 추가 작업할 것이 없으니 종료한 것이라고 볼 수 있습니다.)
[참고] Reducer를 종료하는 것이 아닌 다른 Action을 수행시키는 경우는 어떻게 해야 하나요?
.none을 반환하는 것이 아닌 run을 반환해 주면 됩니다. (이건 다음 글에서 자세하게 설명할게요..ㅎㅎ..)
이것으로 TCA의 State, Action, Reducer를 모두 만들어줬습니다.
마지막으로 Store를 만들어볼게요.
Store는 쉽게 말해서 뷰의 State와 Reducer 객체를 저장하고 있는 저장소입니다.
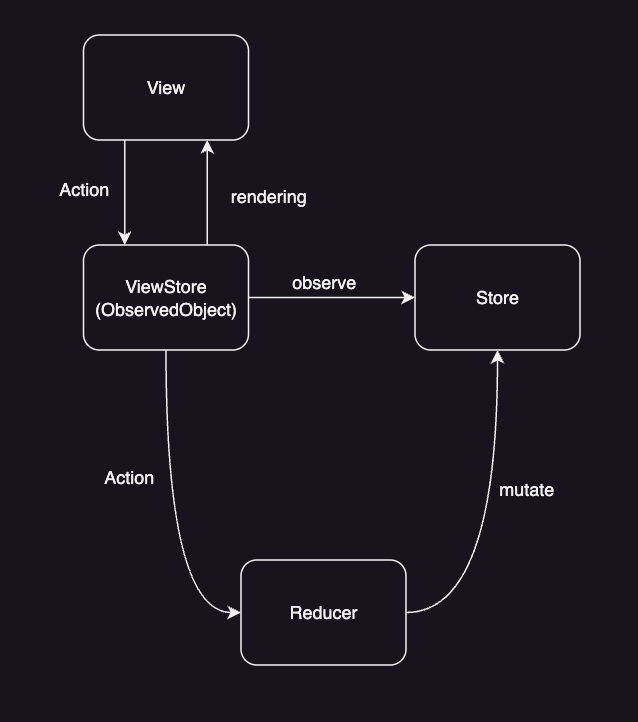
그런데 TCA에선 ViewStore라는 개념이 하나 추가됩니다.
ViewStore는 Store를 관찰함과 동시에 Reducer한테 Action을 전달하는 역할도 합니다.
즉, SwiftUI의 View와 Store를 사이에 위치한다고 보면 될 것 같아요.
(제가 이해한대로 그림을 그려봤는데, 혹시 틀린 부분 있으면 알려주세요!)
코드로 살펴볼게요.
This file contains bidirectional Unicode text that may be interpreted or compiled differently than what appears below. To review, open the file in an editor that reveals hidden Unicode characters.
Learn more about bidirectional Unicode characters
SwiftUI에서 Store를 만들 땐StoreOf를 사용하고, ViewStore를 만들 땐WithViewStore를 사용합니다.
WithViewStore의 closure는 ViewBuilder이기 때문에 closure 안에 View를 구현하면 되고, closure의 argument인 ViewStore는 내부 코드를 살펴보면 ObservedObject인 것을 알 수 있습니다.
그리고 viewStore.send를 통해서 ViewStore에서 Reducer로 Action을 전달해 줍니다.
[참고] ViewStore의 State 내부 값에 접근하는데, viewStore.state.count가 아니라 viewStore.count가 가능한 이유가 뭔가요?
dynamicMemberLookup 덕분입니다.
dynamicMemberLookup & KeyPath를 사용하면 dot(.) operator로 멤버에 접근할 수 있게 됩니다. dynamicMemberLookup에 대해 설명해 놓은 글이 있으니 참고해 주세요. - https://phillip5094.tistory.com/135
이걸로 View 구현은 끝났고, 이제 마지막으로 View한테 Store 객체를 주입해 줘야겠죠?
아래처럼 State 객체와 Reducer 객체를 생성해서 Store 초기값을 넘겨주면 됩니다.
This file contains bidirectional Unicode text that may be interpreted or compiled differently than what appears below. To review, open the file in an editor that reveals hidden Unicode characters.
Learn more about bidirectional Unicode characters