저번 글 UICollectionView (1)에 이어서 진행할게요.
(이전 글에서 구현한 코드를 그대로 사용할 거예요)
글 쓰기 전에 이전 글에서 구현한 전체 소스코드를 먼저 보여드릴게요.
class ViewController: UIViewController {
    private var data = (0...21).map{ String($0) + ".png" }
    @IBOutlet weak var collectionView: UICollectionView!

    override func viewDidLoad() {
        super.viewDidLoad()
        collectionView.delegate = self
        collectionView.dataSource = self
    }
}

extension ViewController: UICollectionViewDelegate, UICollectionViewDataSource {
    func collectionView(_ collectionView: UICollectionView, numberOfItemsInSection section: Int) -> Int {
        return data.count
    }

    func collectionView(_ collectionView: UICollectionView, cellForItemAt indexPath: IndexPath) -> UICollectionViewCell {
        let cell = collectionView.dequeueReusableCell(withReuseIdentifier: MyCustomCell.cellId, for: indexPath) as! MyCustomCell
        cell.image.image = UIImage(named: data[indexPath.row])
        cell.image.contentMode = .scaleAspectFill
        return cell
    }
}
class MyCustomCell: UICollectionViewCell {
    static let cellId: String = "myCustomCell"
    @IBOutlet weak var image: UIImageView!
}
## 1. insert, delete, move
우선 item 삽입하는 방법에 대해 알아볼게요.
collectionView 맨 처음에 '0.png' 이미지를 넣고 싶으면
data.insert("10.png", at: 0)
collectionView.insertItems(at: [ IndexPath(item: 0, section: 0) ])
이게 끝이에요ㅎㅎ
collectionView는 알아서 애니메이션을 지원해주기 때문에 매끄럽게 추가되는 것을 볼 수 있어요.

다만, 주의할 점이 있어요.
위 코드를 보면 item 정보를 가지고 있는 data 변수에 먼저 추가한 다음 collectionView에 insertItems를 호출해줬죠?
만약, 아래처럼 collectionView에 insertItems를 먼저 하고 data 변수를 수정하면 어떻게 될까요??
collectionView.insertItems(at: [ IndexPath(item: 0, section: 0) ])
data.insert("0.png", at: 0)
아래와 같은 에러 로그가 뜨면서
[UICollectionView] Performing reloadData as a fallback — Invalid update: invalid number of

items in section 0. The number of items contained in an existing section after the update

(22) must be equal to the number of items contained in that section before the update (22),

plus or minus the number of items inserted or deleted from that section (1 inserted, 0 deleted)

and plus or minus the number of items moved into or out of that section (0 moved in, 0 moved out).

Collection view: <UICollectionView: 0x7fe46d81c400; frame = (0 48; 414 754); clipsToBounds = YES;

autoresize = RM+BM; gestureRecognizers = <NSArray: 0x600003eef1e0>; layer = <CALayer: 0x60000303d0a0>;

contentOffset: {0, 0}; contentSize: {414, 1100}; adjustedContentInset: {0, 0, 0, 0};

layout: <UICollectionViewFlowLayout: 0x7fe46c20be20>; dataSource: <collectionView_practice.ViewController: 0x7fe46b708010>>

애니메이션도 정상 동작하지 않아요..
(사실 크래쉬가 날 줄 알았는데ㅋㅋㅋ)
로그 내용을 토대로 해석해보자면,
collectionView 업데이트 전과 후의 아이템 개수는 동일해야 해!
근데, 지금은 개수가 달라! (아이템이 추가된 것 같은데??)
업데이트할 수가 없으니까 그냥 reload 할게!
reload 하니까 애니메이션은 어림도 없지.
인 것이에요.
즉, collectionView가 업데이트될 때는, 출력할 데이터가 항상 올바르다는 것을 가정하고 있다는 것이에요.
이처럼 잘못 구현하면 정상 동작하지 않을 수 있으니 이 부분은 꼭 주의해주세요!!
item 삭제, 이동하는 것도 삽입하는 것과 동일하니 빠르게 보고 갈게요.
collectionView의 첫 번째 item을 삭제해볼게요.
data.remove(at: 0)
collectionView.deleteItems(at: [ IndexPath(item: 0, section: 0) ])

0번째 item을 2번째 index에 이동시켜 볼게요.
let item = data.remove(at: 0)
data.insert(item, at: 2)
collectionView.moveItem(at: IndexPath(item: 0, section: 0), to: IndexPath(item: 2, section: 0))

## 2. performBatchUpdates
삽입, 삭제, 이동하는 동작이 단일로 수행된다면 위처럼 바로바로 호출해줘도 되지만,
만약 여러 수정 사항(삽입, 삭제, 이등)을 하나의 애니메이션으로 처리하고 싶다면 performBatchUpdates(_:completion:) API를 사용해야 합니다.
이때도 주의할 점이 있어요!!
performBatchUpdates(_:completion:) 블록 안에서는 삽입(insert) 보다 삭제(delete) 동작이 우선 실행됩니다.
이게 무슨 말이냐면....
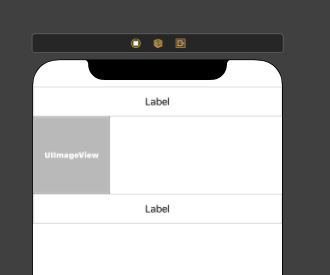
아래는 performBatchUpdates를 사용하지 않고 0번째 index에 아이템을 삽입하고, 2번째 아이템을 제거해볼게요.
data.insert("10.png", at: 0)
collectionView.insertItems(at: [IndexPath(item: 0, section: 0)])

data.remove(at: 2)
collectionView.deleteItems(at: [IndexPath(item: 2, section: 0)])
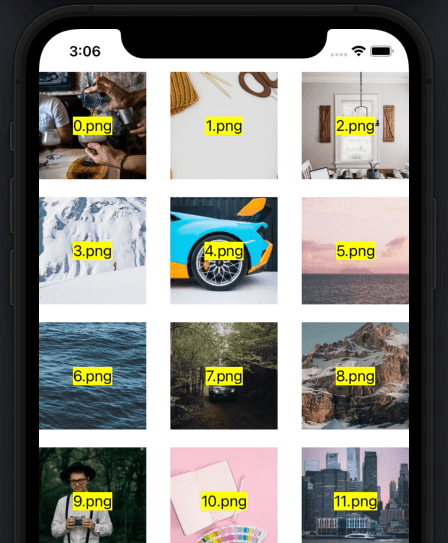
이해하기 쉬우라고 이미지 안에 라벨을 넣어봤어요ㅎㅎㅎ
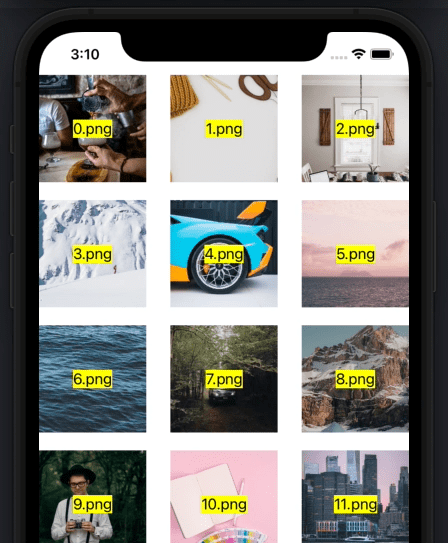
이번엔 performBatchUpdates 안에다가 호출해볼게요.
collectionView.performBatchUpdates {
    data.insert("10.png", at: 0)
    collectionView.insertItems(at: [IndexPath(item: 0, section: 0)])

    data.remove(at: 2)
    collectionView.deleteItems(at: [IndexPath(item: 2, section: 0)])
}
performBatchUpdates 사용 여부에 따른 차이가 눈에 보이시나요???
performBatchUpdates를 사용하지 않았을 때는 "1.png"가 제거되고, performBatchUpdates를 사용할 때는 "2.png"가 제거됩니다.
그 이유는 위에서 설명했듯이 performBatchUpdates(_:completion:) 블록 안에서는 삽입(insert) 보다 삭제(delete) 동작이 우선 실행되기 때문입니다.
자, 천천히 보자면
처음에 data는 ["0.png", "1.png", "2.png", ...] 였겠죠??
performBatchUpdates를 사용 안 하는 경우에는 삽입이 삭제보다 우선 실행되기 때문에 data가 아래처럼 바뀔 것입니다.
["10.png", "0.png", "1.png", "2.png", ...]
그 이후 2번째 아이템을 삭제를 하니, "1.png"가 삭제되는 것입니다.
performBatchUpdates를 사용하는 경우도 살펴볼게요.
performBatchUpdates 블록 안에서는 삭제 동작이 우선 실행되기 때문에 아이템을 삽입하기 전 2번째 index에 해당하는 "2.png"가 삭제되는 것입니다.
이해가 가시나요???ㅎㅎㅎ
이처럼 performBatchUpdates를 사용하면 수행 순서도 달라지고, 애니메이션 동작하는 것도 살짝 다를 수 있습니다.
실제로 구현할 때는 모든 경우에 대해서 잘 동작하는지 꼼꼼하게 확인해봐야 할 것 같아요.
## 3. Header, Footer
이번엔 헤더랑 푸터 뷰를 넣어볼게요.
Attributes inspector를 보면
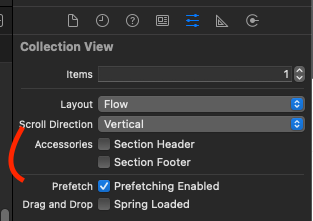
Section Header와 Section Footer를 넣어줄 수 있어요.
두 개 다 체크해볼게요.
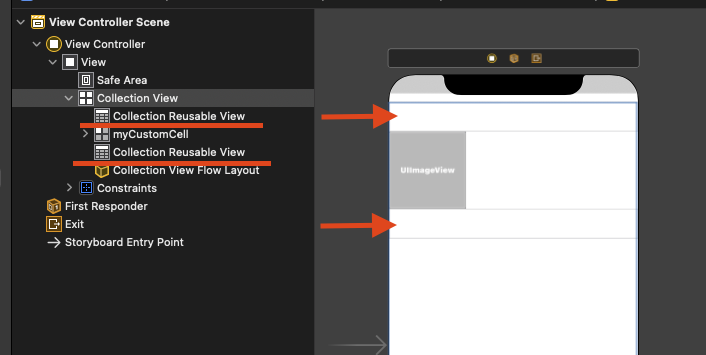
Collection Reusable View라는 것이 추가되었죠??
네. Header와 Footer는 UICollectionReusableView를 상속받은 뷰여야 합니다. 일단 이정도만 알고 있는 상태에서
헤더와 푸터에 간단한 라벨을 추가해줄게요.
그리고 collectionView에 아이템을 추가했을 때와 동일하게 재사용(reuse) 하기 위한 reuse identifier도 넣어줄게요.
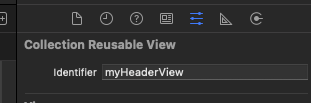

UICollectionReusableView를 상속받은 MyHeaderView와 MyFooterView 클래스를 만들어주고 스토리보드와 연결시켜줄게요.
class MyHeaderView: UICollectionReusableView {
    static let cellId = "myHeaderView"
    @IBOutlet weak var label: UILabel!

    public func setup() {
        label.text = "header"
        backgroundColor = .yellow
    }
}
class MyFooterView: UICollectionReusableView {
    static let cellId = "myFooterView"
    @IBOutlet weak var label: UILabel!

    public func setup() {
        label.text = "footer"
        backgroundColor = .blue
    }
}
header view의 배경은 노랑, footer view의 배경색을 파랑으로 설정했습니다.
그리고 당연히 cellId는 스토리보드에 등록한 reuse identifier와 동일한 값이어야 합니다.
이대로 바로 헤더와 푸터가 나오면 좋겠지만, UICollectionViewDataSource 프로토콜을 준수하는 ViewController 안에 아래 코드를 추가해줘야 합니다.
일단 전체 코드를 먼저 보여드릴게요.
extension ViewController: UICollectionViewDataSource {
    func collectionView(_ collectionView: UICollectionView, viewForSupplementaryElementOfKind kind: String, at indexPath: IndexPath) -> UICollectionReusableView {
        switch kind {
        case UICollectionView.elementKindSectionHeader:
            let headerView = collectionView.dequeueReusableSupplementaryView(ofKind: kind, withReuseIdentifier: MyHeaderView.cellId, for: indexPath) as! MyHeaderView
            headerView.setup()
            return headerView
        case UICollectionView.elementKindSectionFooter:
            let footerView = collectionView.dequeueReusableSupplementaryView(ofKind: kind, withReuseIdentifier: MyFooterView.cellId, for: indexPath) as! MyFooterView
            footerView.setup()
            return footerView
        default:
            assert(false, "Invalid element type")
        }
    }
}
위 코드 안에서 supplementaryView 라는 용어가 자주 나오는데요,
supplementaryView란, collectionView에서 헤더와 푸터 같은 부가적인 뷰들을 말합니다.
즉, 위의 method는 collectionView 안에 있는 supplementaryView가 어떤 종류(kind)인지 파악하고 어떻게 출력해줄지 결정해주는 거예요.
이제 빌드해볼게요.
(한눈에 보기 위해서 collectionView 아이템의 개수를 줄였습니다.)
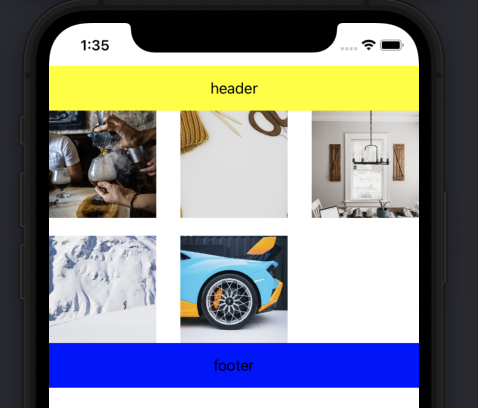
👍
근데 보다 보니까...... header와 footer 뷰가 아이템과 너무 딱 달라붙어있는 것이 속상하네요...
이럴 땐, 스토리보드의 size inspector로 가셔서 Section Insets에 값을 설정해주면 됩니다.
header와 footer가 위아래로 너무 딱 달라붙어 있으니, Top = 10, Botton = 10을 주고 빌드해볼게요
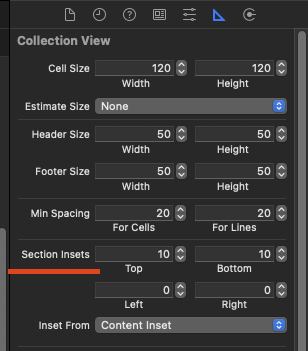

이쁘게 잘 나왔네요ㅎㅎㅎ 👍 👍 👍
마지막으로 Section의 개수를 추가해볼까요??
numberOfSections(in:) method를 구현해서 Section의 갯수를 리턴해주면 됩니다.
이번엔 Section을 2개로 설정해보겠습니다.
extension ViewController: UICollectionViewDataSource {
    func numberOfSections(in collectionView: UICollectionView) -> Int {
        return 2
    }
}
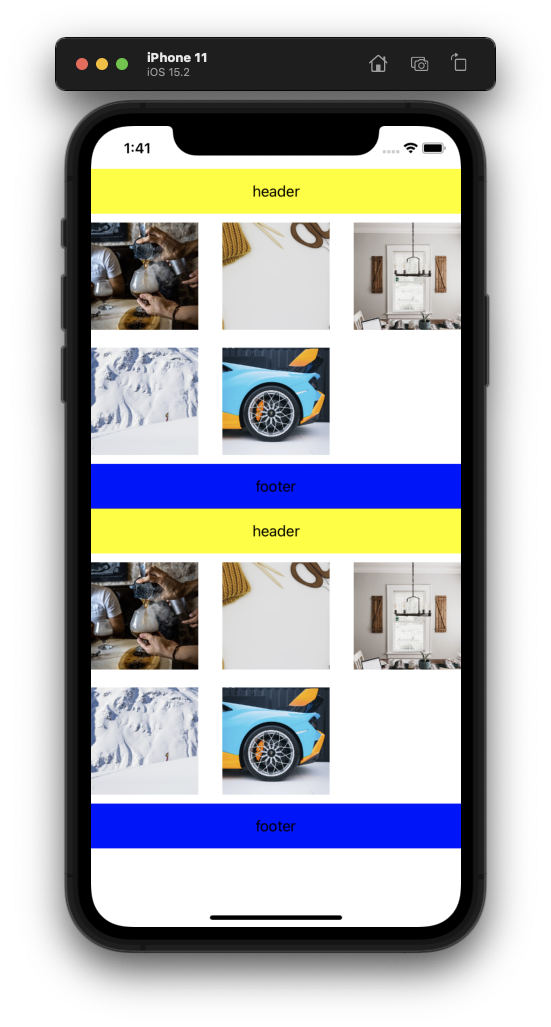
👍 👍 👍 👍
이번 글은 여기서 마무리.
'UIKit' 카테고리의 다른 글
| Image 비동기 로딩 API (UIKit) (0) | 2022.03.23 |
|---|---|
| DiffableDataSource를 사용해서 TableView 드래그&드롭 기능 넣기 (0) | 2022.02.19 |
| DiffableDataSource (0) | 2022.02.19 |
| UICollectionView (1) (0) | 2022.02.13 |
| Autoresizing Mask, translatesAutoresizingMaskIntoConstraints (0) | 2022.02.11 |