안녕하세요.
이번에는 전에 공부한 DiffableDataSource를 UITableView에 적용해보고
드래그 & 드롭 기능까지 추가해보는 시간을 가져볼게요.
(전체 프로젝트는 github에 올려두었습니다.)
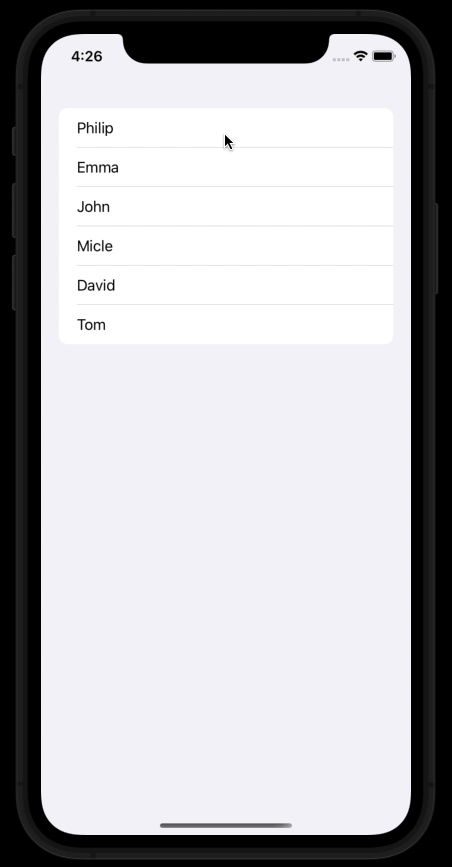
아래는 결과 화면이에요ㅎㅎ
이번 글은 아래 글을 토대로 작성하였습니다.
* https://www.swiftjectivec.com/tableview-diffable-datasource-drag-to-reorder/
Drag to Reorder in UITableView with Diffable Datasource
Support drag to reorder in a UITableView using a diffable datasource.
www.swiftjectivec.com
* https://www.swiftjectivec.com/use-preview-parameters-to-customize-drag-items/
Using UIDragPreview to Customize Drag Items
Leverage UIDragPreviewParameters with UIDragPreview to change how dragged items appear.
www.swiftjectivec.com
## 1. DiffableDataSource를 사용한 UITableView
DiffableDataSource를 사용하려면 Hashable을 준수한 Section과 Item이 필요합니다.
Section은 enum으로, Item은 Person이란 구조체로 만들어줄게요.
enum Section: CaseIterable {
    case main
}
(DiffableDataSource 글에서도 말씀드렸지만, enum의 경우 모든 case와 associated value가 hashable 하다면 자동으로 Hashable을 준수하게 됩니다.)
struct Person: Hashable {
    let name: String
    let id = UUID()
}

extension Person {
    static var data = [
        Person(name: "Philip"),
        Person(name: "Emma"),
        Person(name: "John"),
        Person(name: "Micle"),
        Person(name: "David"),
        Person(name: "Tom"),
    ]
}
그리고 UITableViewDiffableDataSource를 상속받은 TableDataSource 클래스를 만들어줄게요.
class TableDataSource: UITableViewDiffableDataSource<Section, Person> {
	// DataSource 관련 프로토콜을 override할 예정
}
여기서, '그냥 UITableViewDiffableDataSource를 바로 쓰면 안됨??' 이라는 의문점을 가질 수 있어요.
근데 저희는 드래그 & 드롭을 구현할 것이라, 그와 관련된 method를 override하기 위해서 상속을 받은 것이에요ㅎㅎ
이제 이 dataSource를 tableView에 연결시키고 apply를 해줄게요.
class ViewController: UIViewController {
    var people: [Person] = Person.data
    let tableView = UITableView(frame: .zero, style: .insetGrouped)
    var dataSource: TableDataSource!

    override func viewDidLoad() {
        super.viewDidLoad()

        tableView.register(UITableViewCell.classForCoder(), forCellReuseIdentifier: "cell")
        view.addSubview(tableView)
        tableView.frame = view.bounds
        tableView.autoresizingMask = [.flexibleWidth, .flexibleHeight]

        // dataSource와 tableView 연결
        dataSource = TableDataSource(tableView: tableView) { (tableView, indexPath, person) -> UITableViewCell? in
            let cell = tableView.dequeueReusableCell(withIdentifier: "cell", for: indexPath)
            cell.textLabel?.text = person.name
            return cell
        }

        // apply를 사용해서 UI 업데이트
        var snapshot = dataSource.snapshot()
        snapshot.appendSections([.main])
        snapshot.appendItems(people, toSection: .main)
        dataSource.apply(snapshot, animatingDifferences: false)
    }
}

dataSource랑 tableView가 잘 연결되었고, 화면도 잘 나오네요ㅎㅎ 👍 👍 👍
이제 드래그 & 드롭 기능을 추가해봅시다.
## 2. Drag & Drop 추가
UITableViewDragDelegate 프로토콜과 UITableViewDropDelegate 프로토콜을 준수해줍시다.
class ViewController: UIViewController {
	// ...
    override func viewDidLoad() {
        super.viewDidLoad()

    	// ...

        tableView.dragDelegate = self
        tableView.dropDelegate = self
        tableView.dragInteractionEnabled = true

        // ...
    }
}

extension ViewController: UITableViewDragDelegate {
    func tableView(_ tableView: UITableView, itemsForBeginning session: UIDragSession, at indexPath: IndexPath) -> [UIDragItem] {
        guard let item = dataSource.itemIdentifier(for: indexPath) else { return [] }
        let itemProvider = NSItemProvider(object: item.id.uuidString as NSString)
        let dragItem = UIDragItem(itemProvider: itemProvider)
        dragItem.localObject = item
        return [dragItem]
    }
}

extension ViewController: UITableViewDropDelegate {
    func tableView(_ tableView: UITableView, dropSessionDidUpdate session: UIDropSession, withDestinationIndexPath destinationIndexPath: IndexPath?) -> UITableViewDropProposal {
        return UITableViewDropProposal(operation: .move, intent: .insertAtDestinationIndexPath)
    }

    func tableView(_ tableView: UITableView, performDropWith coordinator: UITableViewDropCoordinator) {

    }
}
이제, TableDataSource 클래스로 가서 tableView(_:canMoveRowAt:) method와 tableView(_:moveRowAt:to:) method를 override 해줍니다.
(이걸 위해 UITableViewDiffableDataSource를 상속받은 것이지요ㅎㅎ)
class TableDataSource: UITableViewDiffableDataSource<Section, Person> {
    override func tableView(_ tableView: UITableView, canMoveRowAt indexPath: IndexPath) -> Bool {
        return true
    }

    override func tableView(_ tableView: UITableView, moveRowAt sourceIndexPath: IndexPath, to destinationIndexPath: IndexPath) {
        guard let fromItem = itemIdentifier(for: sourceIndexPath),
              let toItem = itemIdentifier(for: destinationIndexPath),
              sourceIndexPath != destinationIndexPath else { return }

        var snap = snapshot()
        snap.deleteItems([fromItem])

        if destinationIndexPath.row > sourceIndexPath.row {
            snap.insertItems([fromItem], afterItem: toItem)
        } else {
            snap.insertItems([fromItem], beforeItem: toItem)
        }

        apply(snap, animatingDifferences: false)
    }
}
tableView(_:moveRowAt:to:) method 중간 부분을 보면
if destinationIndexPath.row > sourceIndexPath.row {
    snap.insertItems([fromItem], afterItem: toItem)
} else {
    snap.insertItems([fromItem], beforeItem: toItem)
}
이런 코드가 있어요. 왜 이렇게 구현해야하는지 이해가 잘 안 가실 수도 있으니 설명을 드릴게요.
만약, 현재 아래와 같은 상태를 가지고 있다고 가정해볼게요.
current state : [A, B, C, D, E, F]
UI 업데이트를 하기 위해 현재 상태를 snapshot으로 복사를 해올 것입니다.
snapshot : [A, B, C, D, E, F]
여기서 B를 E와 F 사이에 넣는다면, 최종 상태는 이렇게 되겠죠???
new state : [A, C, D, E, B, F]
이때 sourceIndexPath.row = 1, destinationIndexPath.row =4(B가 들어가야 할 최종 index)가 될 거예요.
이때 주의해야 할 것이 itemIdentifier(for: index)를 호출하게 되면, snapshot에서 값을 가져오는 것이 아닌 현재 상태(dataSource)에서 가져오게 됩니다.
즉, itemIdentifier(for: sourceIndexPath) = B, itemIdentifier(for: destinationIndexPath) = E (current state에서 4번째 index)가 되는 것이죠.
B를 삽입하기 전에 우선 snapshot에서 제거해줬어요.
snapshot : [A, C, D, E, F]
B를 E와 F 사이에 넣기로 했으니, E 다음(after)에 넣어줘야겠죠??
그래서 beforeItem이 아닌 snap.insertItems([fromItem], afterItem: toItem) method를 호출해주는 것입니다.
지금 예시는 destinationIndexPath.row > sourceIndexPath.row 인 경우, 즉 아이템을 드래그해서 아래로 내리는 경우에 대한 것이구요,
반대인 경우도 똑같이 생각해보면 되겠죠?ㅎㅎㅎ
반대 경우에 대한 설명은 생략할게요 ^^.
이게 다예요ㅎㅎㅎ
이제 빌드해보면

아주 좋네요ㅎㅎㅎ 👍 👍 👍
## 3. UIDragPreview
한 가지 더 욕심을 부려보자면....

아이템을 드래그할 때 위쪽 모서리는 직각이고... 아래쪽 모서리는 둥글죠??
DiffableDataSource 하고는 연관이 없지만, 마지막으로 이것까지 이쁘게 처리하고 이번 글은 마무리할게요.
드래그되고 있는 뷰를 커스텀하기 위해선 아래 method에서 처리를 해줘야 합니다.
// step 1
func tableView(_ tableView: UITableView, itemsForBeginning session: UIDragSession, at indexPath: IndexPath) -> [UIDragItem] {
	// ...
}
그다음엔 indexPath를 통해서 cell에 접근을 해주고
insetBy method를 사용해서 드래그되고 있는 뷰의 크기를 결정해줬어요.
func tableView(_ tableView: UITableView, itemsForBeginning session: UIDragSession, at indexPath: IndexPath) -> [UIDragItem] {
    // 기존 코드
    guard let item = dataSource.itemIdentifier(for: indexPath) else { return [] }
    let itemProvider = NSItemProvider(object: item.id.uuidString as NSString)
    let dragItem = UIDragItem(itemProvider: itemProvider)
    dragItem.localObject = item

    // step 2
    guard let cell = tableView.cellForRow(at: indexPath) else { return [dragItem] }
    let cellInsetContents = cell.contentView.bounds.insetBy(dx: 2.0 , dy: 2.0)

    // ...
}
그리고 UIDragItem은 previewProvider라는 프로퍼티를 가지고 있습니다.
previewProvider 클로저는 UIDragPreview 인스턴스를 리턴하는데, 이 인스턴스를 통해서 드래그되고 있는 뷰를 커스텀할 수 있습니다.
// step 1
func tableView(_ tableView: UITableView, itemsForBeginning session: UIDragSession, at indexPath: IndexPath) -> [UIDragItem] {
	// ...

    // step 3
    dragItem.previewProvider = {

    }

    // ...
}
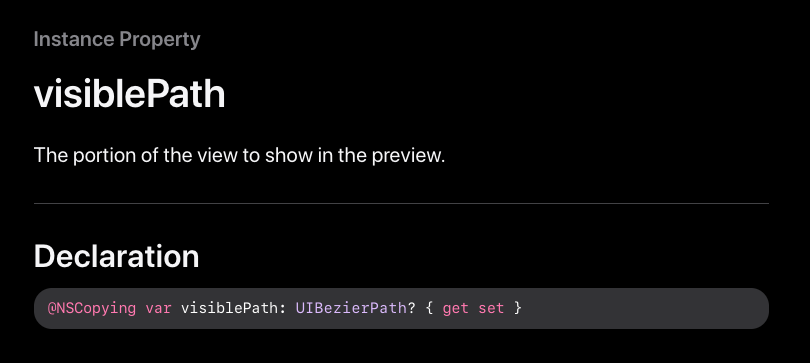
UIDragPreview 인스턴스를 생성하려면 UIDragPreviewParameters 인스턴스가 필요합니다.
UIDragPreviewParameters를 통해서 뷰를 커스텀할 수 있게 되는 거예요.
UIDragPreviewParameters는 UIPreviewParamaters를 상속받은 클래스인데요,

저희의 목적인 둥근 모서리를 구현하기 위해선 UIPreviewParameter의 인스턴스 프로퍼티인 visiblePath를 수정해줘야 합니다.
베지에 곡선을 사용하나 보네요ㅎㅎ..
적당한 cornerRadius를 주고 UIDragPreview 인스턴스를 리턴해줍니다.
func tableView(_ tableView: UITableView, itemsForBeginning session: UIDragSession, at indexPath: IndexPath) -> [UIDragItem] {
    // ...
    dragItem.previewProvider = {
        // step 4
        let dragPreviewParams = UIDragPreviewParameters()
        dragPreviewParams.visiblePath = UIBezierPath(roundedRect:cellInsetContents, cornerRadius: 8.0)
        return UIDragPreview(view: cell.contentView, parameters: dragPreviewParams)
    }

    return [dragItem]
}
이제 실행시켜 볼까요??
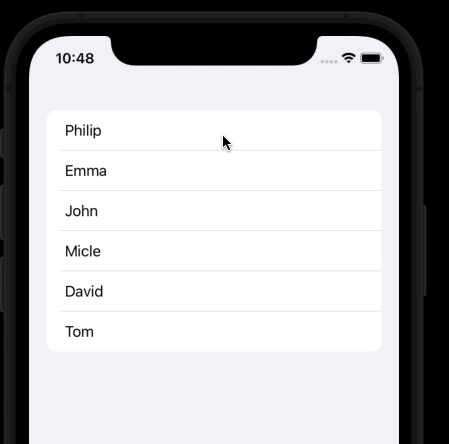
| Before | After |
|
 |
모서리가 아주 이쁘게 잘 나왔네요ㅋㅋㅋ 만족..... 😁 😁
## 4. 참고
* https://www.swiftjectivec.com/tableview-diffable-datasource-drag-to-reorder/
* https://www.swiftjectivec.com/use-preview-parameters-to-customize-drag-items/
전체 프로젝트는 github에 올려두었습니다.
이번 글은 여기서 마무리.
'UIKit' 카테고리의 다른 글
| UIKeyboardLayoutGuide (0) | 2022.03.29 |
|---|---|
| Image 비동기 로딩 API (UIKit) (0) | 2022.03.23 |
| DiffableDataSource (0) | 2022.02.19 |
| UICollectionView (2) (0) | 2022.02.17 |
| UICollectionView (1) (0) | 2022.02.13 |