안녕하세요.
이번에는 alignmentGuide에 대해 알아볼게요.
# 1. alignmentGuide 란?
alignmentGuide는 쉽게 말해서, 뷰를 정렬하는데 기준이 되는 가이드라인을 말해요.
이게 뭔 말이냐...
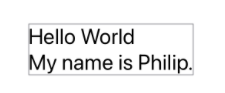
만약에 VStack에서 leading alignment를 준다면,
VStack(alignment: .leading) {
    Text("Hello World").font(.title)
    Text("My name is Philip.").font(.title)
}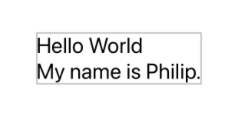
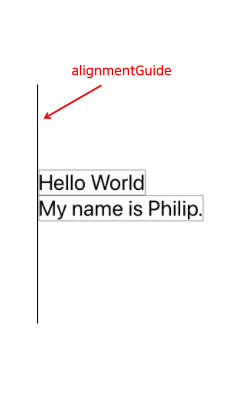
이렇게 보이겠죠??
근데 이게 사실은 alignmentGuide라는 가이드라인이 있고, alignmentGuide를 기준으로 뷰를 배치하는 것이에요.
(leading alignment이니 뷰의 왼쪽 부분이 alignmentGuide에 붙게끔 뷰를 배치하는 것이죠)
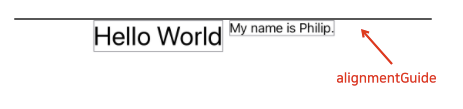
이번에는 HStack에 top alignment를 줘볼까요???
HStack(alignment: .top) {
    Text("Hello World").font(.largeTitle)
    Text("My name is Philip.")
}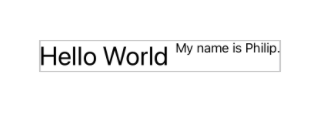
top alignment를 주니 뷰가 alignmentGuide 아래쪽에 오게끔 배치되었어요.
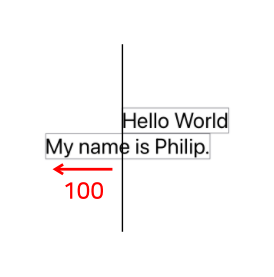
근데 만약, "leading alignment를 줄 건데.... A라는 뷰는 왼쪽 정렬 후에 100만큼 더 왼쪽으로 들어갔으면 좋겠어" 같은 규칙을 주고 싶을 땐 어떻게 할까요??
이럴 때 필요한게 alignmentGuide(_:computeValue:) method입니다.
# 2. alignmentGuide(_:computeValue:) method
vertical alignment 설정을 할 수 있는 alignmentGuide method와

horizontal alignment 설정을 할 수 있는 alignmentGuide method가 있어요.

(두 method 모두 개념은 동일하니 horizontal을 기준으로 설명하겠습니다.)
우선 파라미터 먼저 볼게요.
g : A HorizontalAlignment(또는 VerticalAlignment) value at which to base the offset.
computeValue : A closure that returns the offset value to apply to this view.
g는 쉽게 말해서, 정렬 기준을 말해요. (leading, trailing, top, bottom)
그리고 computeValue는 그 정렬 기준으로부터 얼마만큼의 offset을 이동시키느냐를 의미합니다. offset은 상수값을 넘겨도 되고, ViewDimensions 인수를 클로저에 사용해서 리턴값을 계산할 수도 있습니다.
위에서 언급한 "leading alignment를 줄 건데.... A라는 뷰는 왼쪽 정렬 후에 100만큼 더 왼쪽으로 들어갔으면 좋겠어"를 구현해볼게요.
우선 VStack에 leading alignment를 줍니다.
VStack(alignment: .leading) {
    Text("Hello World").font(.title)
    Text("My name is Philip.").font(.title)
}
그리고 아래쪽 뷰가 왼쪽으로 100만큼 더 들어가도록 alignmentGuide(_:computeValue:) method를 사용합니다.

VStack(alignment: .leading) {
    Text("Hello World").font(.title)
    Text("My name is Philip.").font(.title)
        .alignmentGuide(.leading) { _ in
            100
        }
}
자.. 이게 무슨 의미인지 하나씩 살펴볼게요.
저희는 VStack에 leading alignment를 줬죠??
그럼 하위 뷰들도 leading alignment의 규칙이 적용됩니다. (alignmentGuide 왼쪽에 뷰 배치)
하지만 아래쪽 뷰("My name is Philip.")에는 alignmentGuide 수식어를 사용했죠?
그럼 기본 alignment 규칙이 아닌 클로저를 규칙으로 삼아서 뷰를 배치합니다.
Text("My name is Philip.").font(.title)
    // leading alignment 규칙을 바꿀거야.
    // 규칙은 클로저를 보면 됨.
    .alignmentGuide(.leading) { _ in
        // 100만큼 들어가게 뷰를 배치할거야.
        100
    }
감이 좀 잡히시나요???
또 다른 예시를 볼게요.
만약 아래처럼 배치하고 싶다면
(뷰의 trailing 쪽이 alignmentGuide에 위치하게끔 배치되었죠?)
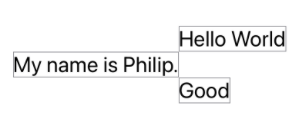
클로저 안에 ViewDimension 인자를 사용해서 trailing을 넘겨주면 됩니다.
VStack(alignment: .leading) {
    Text("Hello World").font(.title)
    Text("My name is Philip.").font(.title)
        .alignmentGuide(.leading) { d in
            d[.trailing]
        }
    Text("Good").font(.title)
}
# 3. offset 하고 차이점
그럼 이쯤에서,
굳이 alignmentGuide 써야 함?? offset으로 적당히 뷰를 옮기면 안 됨??
이라고 생각이 들 수도 있어요.
언뜻 보면 똑같아보일 수 있지만, offset과 alignmentGuide는 뷰의 영역에서 큰 차이를 보입니다.
alignmentGuide는 뷰 자체를 옮겨서 화면에 보여주기 때문에, 현재 화면에 보이는 뷰가 실제 뷰의 영역이 됩니다.
하지만, offset은 뷰 영역을 잡은 뒤에 offset 만큼 이동시켜서 화면에 보여주기 때문에, 현재 화면에 보이는 뷰가 실제 뷰의 영역이 아닙니다.
즉, 아래 같은 차이를 보이는 것이죠
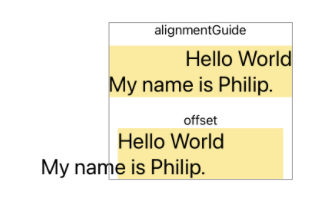
(전체 코드입니다.)
VStack(spacing: 20) {
    VStack(spacing: 10) {
        Text("alignmentGuide")
        VStack(alignment: .leading) {
            Text("Hello World").font(.title)
            Text("My name is Philip.").font(.title)
                .alignmentGuide(.leading) { _ in
                    100
                }
        }
        .background(.yellow.opacity(0.4))
    }

    VStack {
        Text("offset")
        VStack(alignment: .leading) {
            Text("Hello World").font(.title)
            Text("My name is Philip.").font(.title)
                .offset(x: -100)
        }
        .background(.yellow.opacity(0.4))
    }

}
.border(.gray)
alignmentGuide와 offset의 차이를 알고 적절히 사용하면 됩니다ㅎㅎㅎ
# 4. Custom alignmentGuide
custom alignmentGuide를 만들기 전에 custom alignmentGuide가 왜 필요한 지부터 생각해볼게요.
예를 들어서
A라는 뷰와 B라는 뷰를 기준으로 가운데 정렬을 하고 싶은 경우라면,
A, B 뷰는 VStack이라는 컨테이너에 속해 있긴 하지만,
A는 VStack, B는 HStack에 속해있습니다.
즉, A와 B의 정렬 기준이 다르다는 의미이고, 정렬 기준이 다르기 때문에 A와 B를 기준으로 가운데 정렬할 수가 없는 것이죠.
이럴 때 alignmentGuide를 커스텀해서 사용하는 것입니다ㅎㅎㅎ
직접 구현해보면서 설명할게요.
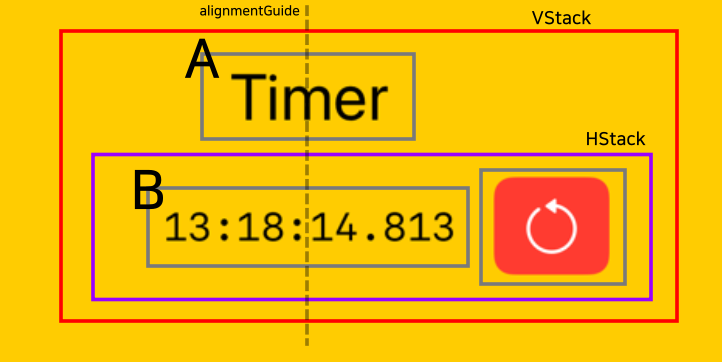
우선, 기본 뼈대부터 만들겠습니다.
VStack {
    Text("Timer")		// A
        .font(.title)

    HStack(spacing: 16) {
        Text("13:18:14.813")	// B
            .font(Font.system(.body, design: .monospaced))

        Button(role: .destructive) {

        } label: {
            Image(systemName: "gobackward")
                .imageScale(.large)
        }
        .buttonStyle(.borderedProminent)
    }
}
center alignment를 줬는데 저희가 기대한 것이 아닌, 위쪽 뷰와 HStack이 서로 가운데 정렬이 되었습니다.
(당연한 얘기겠죠??ㅎㅎ)
HorizontalAlignment를 extension 해서 customCenter라는 custom alignment를 만들어줄게요.
(A, B 뷰를 수평 방향으로 이동시켜서 정렬시켜야 하기 때문에 HorizontalAlignment를 extension 시켜줬습니다. 만약, 수직 방향으로 이동시켜야 한다면 VerticalAlignment를 extension 시켜야겠죠??)
customCenter의 기본 규칙은 HorizontalAlignment.center입니다.
extension HorizontalAlignment {
    private struct CustomCenter: AlignmentID {
        static func defaultValue(in context: ViewDimensions) -> CGFloat {
            context[HorizontalAlignment.center]		// 기본 규칙
        }
    }
    static let customCenter = HorizontalAlignment(CustomCenter.self)
}
A, B를 모두 포함하는 부모 뷰인 VStack에 customCenter alignment 설정을 줍니다.
VStack(alignment: .customCenter) { ✅
    // ...
}
A 뷰는 customCenter의 기본 규칙인 HorizontalAlignment.center를 따르게 됩니다.

그 다음엔 B 뷰한테 alignmentGuide 수식어를 사용해서, customCenter alignment 일 때 B 뷰가 가운데에 올 수 있도록 설정해줄게요.
VStack(alignment: .customCenter) {
    Text("Timer")
        .font(.title)

    HStack(spacing: 16) {
        Text("13:18:14.813")
            .font(Font.system(.body, design: .monospaced))
            .alignmentGuide(.customCenter) {	✅
                $0[HorizontalAlignment.center]
            }
        Button(role: .destructive) {

        } label: {
            Image(systemName: "gobackward")
                .imageScale(.large)
        }
        .buttonStyle(.borderedProminent)
    }
}
옆 버튼은 HStack에 의해 B 뷰가 A 뷰에 맞춰서 가운데 정렬이 된 후에 B 뷰 옆에 위치하게 됩니다.

(아래는 전체 코드입니다.)
extension HorizontalAlignment {
private struct CustomCenter: AlignmentID {
static func defaultValue(in context: ViewDimensions) -> CGFloat {
context[HorizontalAlignment.center]
}
}
static let customCenter = HorizontalAlignment(CustomCenter.self)
}
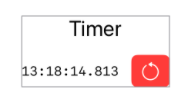
struct ContentView: View {
var body: some View {
VStack(alignment: .customCenter) {
Text("Timer")
.font(.title)
HStack(spacing: 16) {
Text("13:18:14.813")
.font(Font.system(.body, design: .monospaced))
.alignmentGuide(.customCenter) {
$0[HorizontalAlignment.center]
}
Button(role: .destructive) {
} label: {
Image(systemName: "gobackward")
.imageScale(.large)
}
.buttonStyle(.borderedProminent)
}
}
}
}
## 참고
- https://developer.apple.com/documentation/swiftui/aligning-views-within-a-stack
- https://developer.apple.com/documentation/swiftui/view/alignmentguide(_:computevalue:)-7g4ky
- https://developer.apple.com/documentation/swiftui/view/alignmentguide(_:computevalue:)-330fz
- https://developer.apple.com/documentation/swiftui/aligning-views-across-stacks
- https://swiftui-lab.com/alignment-guides/
- https://www.hackingwithswift.com/books/ios-swiftui/alignment-and-alignment-guides
- https://useyourloaf.com/blog/swiftui-stack-custom-center-alignment/
이번 글은 여기서 마무리.
'SwiftUI' 카테고리의 다른 글
| animatableData (0) | 2022.03.03 |
|---|---|
| renderingMode(_:) (0) | 2022.03.01 |
| 스크린샷 주의 팝업, 화면 녹화 방지 (3) | 2022.02.25 |
| SwiftUI Markdown 사용에 대한 3가지 특이점 (0) | 2022.02.24 |
| addArc(tangent1End:tangent2End:radius:) (0) | 2022.02.22 |